This blog will give you insight on how to setup collection of syslogs (CEF) using Linux forwader server using Azure Monitor Agent (AMA).
The CEF via AMA connector is currently in PREVIEW.
This blog-post is part of a series of blog posts to master Azure logging in depth (overview).

To get you started, you can find ARM-templates & scripts in my AzureLogLibrary (github). Details will be covered in the articles.

Quick Links
Setup Linux log-forwarder using AMA
How to start collecting Syslogs using ARM-template ?
How to setup in GUI
High-level architecture / flow
Tutorial – How to make data transformations using Data Collection Rules?
Data transformation architecture
High-level steps to do data transformation
Step 1: Kusto command must be defined
Escape characters in advanced queries
Step 2: Deploy a new DCR
Step 3a: Data transformation using AzLogIngestPS
Step 3b: Adding the TransformKql using REST API and Powershell (alternative method)
Step 4: Verification of changes in DCR (optional)
Step 5: Associate the DCR rule to the machine(s)
Real-life examples of effect of transformations
Example 1 – removing specific SecurityEvent (5145) from a particular server
Example 2 – removing syslog traffic
Setup Linux log-forwarder using AMA
To ingest Syslog and CEF logs into Microsoft Sentinel, you need to designate and configure a Linux machine that collects the logs from your devices and forwards them to your Microsoft Sentinel workspace.
This machine can be a physical or virtual machine in your on-premises environment, an Azure VM, or a VM in another cloud. If this machine is not an Azure VM, it must have Azure Arc installed (see the prerequisites).
This machine has two components that take part in this process:
- A Syslog daemon, either rsyslog or syslog-ng, which collects the logs
- The AMA, which forwards the logs to LogAnalytics/Microsoft Sentinel
When you set up the connector and the DCR, you run a script on the Linux machine, which configures the built-in Linux Syslog daemon (rsyslog.d/syslog-ng) to listen for Syslog messages from your security solutions on TCP/UDP port 514.
I recommend using a Ubuntu 20.04 LTS – supported OS can be found here
I recommend setting the OS-disk to 256 gb, so it will not run out of diskspace, in case of queues sending data to Azure LogAnalytics.
To avoid Full Disk scenarios where the agent can’t function, I also recommend that you set the syslog-ng or rsyslog configuration not to store unneeded logs. A Full Disk scenario disrupts the function of the installed AMA.
You will need to install the AMA extension on the Linux machine.
Collection of both Syslog and CEF logs on same machine
If you plan to use your log forwarder machine to forward both Syslog messages and CEF, you need to make a few changes to avoid the duplication of events to the Syslog and CommonSecurityLog tables.
On each source machine that sends logs to the forwarder in CEF format, you must edit the DCR configuration to ensure that they are not collecting from the same facilities. You will also need to match the facility configuration on the syslog source for example firewall, netscaler, etc.

How to start collecting Syslogs using ARM-template ?
You can check out the ARM-template on my Github
I do also provide more documentation and powershell script to deploy more DCRs
I am also providing ‘Deploy to Azure’ shortcuts, based on the mentioned ARM-templates so you can deploy samples into your environment.
Syslogs (CEF) | Deploy DCR-rule to Azure
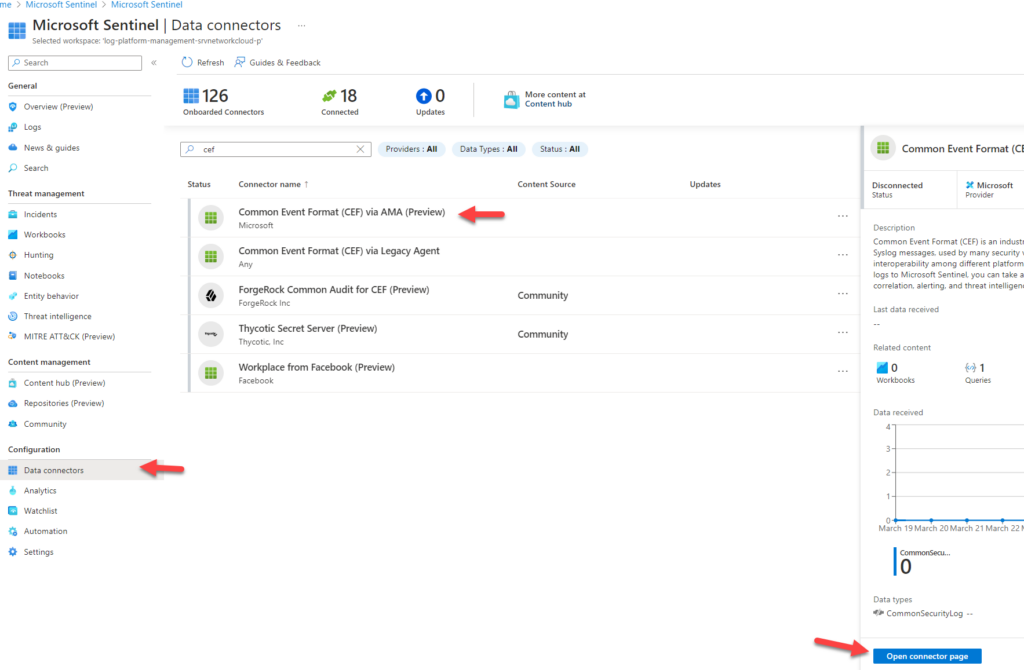
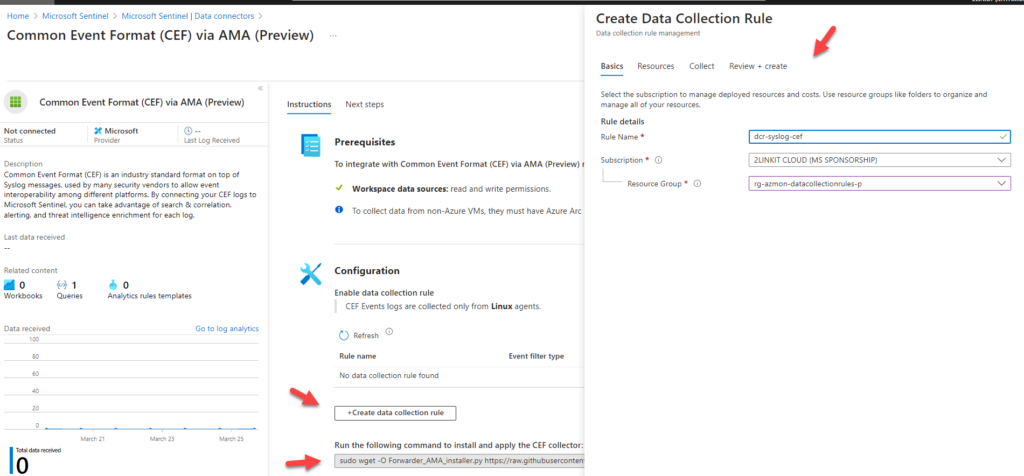
How to setup in GUI ?


High-level architecture / flow
Many network, security appliances, and devices send their logs in the CEF format over Syslog. This format includes more structured information than Syslog, with information presented in a parsed key-value arrangement.
If your appliance or system sends logs over Syslog using CEF, the integration with Microsoft Sentinel allows you to easily run analytics and queries across the data.
CEF normalizes the data, making it more immediately useful for analysis with Microsoft Sentinel. Microsoft Sentinel also allows you to ingest unparsed Syslog events, and to analyze them with query time parsing
All data will be sent into the Azure LogAnalytics standard table, CommonSecurityLog

DCR contains the following dataSources section.
dataSources": {
            "syslog": [
                {
                    "streams": [
                        "Microsoft-Syslog"
                    ],
                    "facilityNames": [
                        "auth",
                        "authpriv",
                        "cron",
                        "daemon",
                        "mark",
                        "kern",
                        "local0",
                        "local1",
                        "local2",
                        "local3",
                        "local4",
                        "local5",
                        "local6",
                        "local7",
                        "lpr",
                        "mail",
                        "news",
                        "syslog",
                        "user",
                        "uucp"
                    ],
                    "logLevels": [
                        "Debug",
                        "Info",
                        "Notice",
                        "Warning",
                        "Error",
                        "Critical",
                        "Alert",
                        "Emergency"
                    ],
                    "name": "sysLogsDataSource-1688419672"
                }
            ]
        }
{
"properties": {
"immutableId": "dcr-3a1b4f3a67cc4758a318423fe6e0e6ca",
"dataSources": {
"syslog": [
{
"streams": [
"Microsoft-Syslog"
],
"facilityNames": [
"auth",
"authpriv",
"cron",
"daemon",
"mark",
"kern",
"local0",
"local1",
"local2",
"local3",
"local4",
"local5",
"local6",
"local7",
"lpr",
"mail",
"news",
"syslog",
"user",
"uucp"
],
"logLevels": [
"Debug",
"Info",
"Notice",
"Warning",
"Error",
"Critical",
"Alert",
"Emergency"
],
"name": "sysLogsDataSource-1688419672"
}
]
},
"destinations": {
"logAnalytics": [
{
"workspaceResourceId": "/subscriptions/fce4f282-fcc6-43fb-94d8-bf1701b862c3/resourceGroups/rg-logworkspaces/providers/Microsoft.OperationalInsights/workspaces/log-platform-management-srvnetworkcloud-p",
"workspaceId": "b7d80924-d55d-4bf6-b2b3-9889301c7114",
"name": "la--24873827"
}
]
},
"dataFlows": [
{
"streams": [
"Microsoft-Syslog"
],
"destinations": [
"la--24873827"
]
}
],
"provisioningState": "Succeeded"
},Tutorial – How to make data transformations using Data Collection Rules?
The below text is embedded from another blog post
This section will show you the steps for setting up data transformations – and how you can do the transformation using AzLogDcrIngestPS (my new Powershell module) – or using REST API commands in Powershell
If you want to read about transformation in depth, you can find more details here
You can also get inspired of real-life samples (and their effects) of using transformation to reduce costs.
Quick Links
Data transformation architecture
High-level steps to do data transformation
Step 1: Kusto command must be defined
Escape characters in advanced queries
Step 2: Deploy a new DCR
Step 3a: Data transformation using AzLogIngestPS
Step 3b: Adding the TransformKql using REST API and Powershell (alternative method)
Step 4: Verification of changes in DCR (optional)
Step 5: Associate the DCR rule to the machine(s)
Real-life examples of effect of transformations
Example 1 – removing specific SecurityEvent (5145) from a particular server
Example 2 – removing syslog traffic
Data transformation architecture
Data transformations runs in the Azure Data Ingestion Pipeline and happens very fast as data is being uploaded.

Data transformations are defined in the transformKql property in the DCR section dataFlows.
dataFlows": [
            {
                "streams": [
                    "Microsoft-SecurityEvent"
                ],
                "destinations": [
                    "DataCollectionEvent"
                ],
                "transformKql": "source | where (EventID != 8002) and (EventID != 5058) and (EventID != 4662) ",
                "outputStream": "Microsoft-SecurityEvent"
            }
High-level steps to do data transformation
The 5 steps to add a data transformations are:
- Kusto command must be defined to understand the syntax to exclude the data
- Deploy a new DCR
- Add the transformKql to the DCR – I am covering 2 methods for this in the article (AzLogIngestPS and REST API)
- Verification of changes in DCR (optional)
- Assign the DCR to the machine(s) where the transformation must happen
In the example below, I am doing a transformation to remove data. Another example is to add new columns, based on incoming data.
I hope the below example gives you the insight to understand how to work with transformation.
Step 1: Kusto command must be defined
Transformations defines which data should be sent through the pipeline.
If you want to exclude specific events, you will instruct the transformation to exclude these events using standard Kusto – except you will refer to the tablename as source
source where (EventID != 4662)
Below are 4 samples
| SecurityEvent | where EventID != 5145 | Here I want to see all Security event except for EventID = 5145 |
| SecurityEvent | where (EventID != 8002) and (EventID != 5058) and (EventID != 4662) | Here I want to see all Security events except for EventID = 8002,5058,4662 |
| Event | where ( (EventID != 10016 and EventLog == “Application”) ) | Here I want to see all Event system and application events, except for application events with eventid 10016 |
| CommonSecurityLog | where (DeviceVendor !contains “sonicwall”) or ((DeviceVendor contains “sonicwall”) and (Activity contains “connection opened” or Activity contains “connection closed”) and (Protocol != “udp/dns”)) | Here I want to see all CEF/syslog where devicevendor is different from sonicwall like Cisco and all sonicwall events, except if protocol is udp/dns |
Since the transformation is applied to each record individually, it can’t use any KQL operators that act on multiple records. Only operators that take a single row as input and return no more than one row are supported.
For example, summarize isn’t supported since it summarizes multiple records. See Supported KQL features for a complete list of supported features.
Therefore you cannot use cross-workspace references like doing lookup in another table.
When the Kusto command is working as expected, then change the tablename to source.
SecurityEvent | where EventID != 5145was changed to
source | where EventID != 5145Escape characters in advanced queries
If you need to work with advanced queries, it can be required to adjust the query with escape characters:
SecurityEvent | where (Account != “WINSFTP\\autotest”) and (EventID != 4688 and EventID != 8002 and EventID != 4625) and (Account != “WORKGROUP\\WINSFTP$”)will be changed to
source\r\n| where (Account != \”CVT-WINSFTP\\\\cvtautotest\”) and (EventID != 4688 and EventID != 8002 and EventID != 4625) and (Account != \”WORKGROUP\\\\CVT-WINSFTP$\”)Using online converter
In case you are working with advanced queries, I prefer to take my Kusto query and paste it in an online converter, which will convert the query with escape characters.
Personally, I use the online website https://jsonformatter.org/json-escape
Step 2: Deploy a new DCR
Configure a standard DCR rule and choose to collect what you want like for example all security events or all system and application events.
Make a note of the ResourceId of the DCR rule. You will use the ResourceId in step 3


Step 3a: Data transformation using AzLogIngestPS
It is very easy to work with transformations using my powershell module, AzLogIngestPS.
You can read about my powershell module, AzLogIngestPS here
To get started viewing an existing transformation, you will only require the ResourceId, which was noted in the previous step 2.
You can view an existing data transformations (transformKql) using the function Get-AzDataCollectionRuleTransformKql
Get-AzDataCollectionRuleTransformKql -DcrResourceID <DCR resourceid>Here you can see value of the transformKql marked in bold (source ….)
PS > Get-AzDataCollectionRuleTransformKql -DcrResourceId /subscriptions/fxxxxx4d8-bf1701b862c3/resourceGroups/rg-logworkspaces/providers/microsoft.insights/dataCollectionRules/dcr-ingest-exclude-security-eventid
source | where (EventID != 8002) and (EventID != 5058) and (EventID != 4662) and (EventID != 4688)
You can add a transformation to an existing DCR using the function Update-AzDataCollectionRuleTransformKql
Update-AzDataCollectionRuleTransformKql -DcrResourceId <DCR-ID> -transformKql <transform-KQL>Here you can see the value before and after updating the transformation.
Value before
PS > Get-AzDataCollectionRuleTransformKql -DcrResourceId /subscriptions/fce4f282-fcc6-43fb-94d8-bf1701b862c3/resourceGroups/rg-logworkspaces/providers/microsoft.insights/dataCollectionRules/dcr-ingest-exclude-security-eventid
source | where (EventID != 8002) and (EventID != 5058) and (EventID != 4662) and (EventID != 4688)
Adding the transformation
PS > Update-AzDataCollectionRuleTransformKql -DcrResourceId /subscriptions/xxxxxx-43fb-94d8-bf1701b862c3/resourceGroups/rg-logworkspaces/providers/microsoft.insights/dataCollectionRules/dcr-ingest-exclude-security-eventid -transformKql  "source | where (EventID != 8002) and (EventID != 5058) and (EventID != 4662) and (EventID != 4688) and (EventID != 4663)"

Updating transformKql for DCR
/subscriptions/xxxxxfb-94d8-bf1701b862c3/resourceGroups/rg-logworkspaces/providers/microsoft.insights/dataCollectionRules/dcr-ingest-exclude-security-eventid
Value after – note “and (EventID != 4663)” has been added compared to before value
PS > Get-AzDataCollectionRuleTransformKql -DcrResourceId /subscriptions/xxxxx3fb-94d8-bf1701b862c3/resourceGroups/rg-logworkspaces/providers/microsoft.insights/dataCollectionRules/dcr-ingest-exclude-security-eventid
source | where (EventID != 8002) and (EventID != 5058) and (EventID != 4662) and (EventID != 4688) and (EventID != 4663)
You can install AzLogDcrIngestPS from Powershell gallery
install-module AzLogIngestPSYou need to connect to Azure first with an account with RBAC permissions.
PS > Connect-AzAccountStep 3b: Adding the TransformKql using REST API and Powershell (alternative method)
As an alternative to using AzLogIngestPS, you can also call REST API and add the transformKql command.
TransformKql requires a REST API call to minimum api-version 2021-09-01-preview. You can see the syntax below.
Currently, the recommended API is 2022-06-01.
You can see available API version in the GUI.


The steps to add a transformation to an existing DCR are:
- Retrieve the entire DCR using REST API (GET) in JSON format – and save it to a TXT file
- Edit the file – and add the transformKql parameter in the dataFlow section
- Upload the entire file content using REST API (PUT)
I have provided a Powershell script on my github to retrieve the DCR into a flat JSON-file so you can edit the file and add the needed transformation – and then upload the modified DCR again.
Below I have created a sample folder C:\TMP where the file will be stored
Start by setting the variables $ResourceId and $FilePath
ResourceId was noted in the previous step 2
FilePath can be any path – it is only a temporary file used for this change as example
####################################################
# VARIABLES
####################################################

# here you put the ResourceID of the Data Collection Rules (a sample is provided below)
$ResourceId = "/subscriptions/xxxxxx/resourceGroups/rg-logworkspaces/providers/microsoft.insights/dataCollectionRules/dcr-ingest-exclude-security-eventid"

# here you put a path and file name where you want to store the temporary file-extract from DCR (a sample is provided below)
$FilePath   = "c:\tmp\dcr-ingest-exclude-security-eventid.txt"
Connect to Azure
####################################################
# CONNECT TO AZURE
####################################################

Connect-AzAccount
Run the export DCR
$DCR = Invoke-AzRestMethod -Path ("$ResourceId"+"?api-version=2022-06-01") -Method GET

$DCR.Content | ConvertFrom-Json | ConvertTo-Json -Depth 20 | Out-File -FilePath $FilePath
Now you have a JSON file in c:\tmp folder
Modify file and add TransformKql
Open the file using your favorite editor and add the line transformKql command that you created in step 1
"transformKql": "source\n| where (EventID != 5145)",NOTE: Remember to add the , (comma) at the end of the line so you are not breaking the JSON syntax.
"dataFlows": [
            {
                "streams": [
                    "Microsoft-SecurityEvent"
                ],
                "destinations": [
                    "DataCollectionEvent"
                ],
                "transformKql": "source | where (EventID != 8002) and (EventID != 4688) and (EventID != 4663)",
                "outputStream": "Microsoft-SecurityEvent"
            }
        ],
Upload the modified DCR (overwrite)
Now you want to run the last part of the powershell script, which will update the DCR taking the entire content of the local file and making PUT REST call against the specific api version 2022-06-01.
####################################################
# UPLOAD FILE / UPDATE DCR WITH TRANSFORM
####################################################

$DCRContent = Get-Content $FilePath -Raw

Invoke-AzRestMethod -Path ("$ResourceId"+"?api-version=2022-06-01") -Method PUT -Payload $DCRContent
You should be getting a StatusCode 200 with the PUT commmand, indicating everything it updated correctly

If there is is an error in the file structure, you will get an error 400

Step 4: Verification of changes in DCR (optional)
You can choose to check in the GUI for the change. Remember to choose the API-version 2022-06-01 (or 2021-09-01-preview). Otherwise you wont be able to see the change.


You will now see the transformKql.
You can also extract the changes running the first lines again to extract into the local file using the GET command
####################################################
# EXPORT EXISTING DCR TO FILE
####################################################

$DCR = Invoke-AzRestMethod -Path ("$ResourceId"+"?api-version=2022-06-01") -Method GET

$DCR.Content | ConvertFrom-Json | ConvertTo-Json -Depth 20 | Out-File -FilePath $FilePath
Step 5: Associate the DCR rule to the machine(s)
Lastly you have to associate the DCR rule to the machine(s) where you want the transformation to happen.

You have to wait for pipeline transformation to happen. Normally it will start within 5 minutes, sometimes a little longer.
Real-life examples of effect of transformations
Below you can find some examples and their effect of using transformations – with focus on cost reductions.
As you can see, the results were a significant decrease.
Of course there is a trade-off, which must be considered. There are always 2 sides of the coin – will I miss the data at some point !
Example 1 – removing specific SecurityEvent (5145) from a particular server


The effect in cost – here shown in DKK, where the daily cost drops to DKK 2300 from DKK 5000

Example 2 – removing syslog traffic
Here is an example where I did a transformation removing Syslog events with specific patterns.
source
| where (DeviceVendor !contains "sonicwall") or ((DeviceVendor contains "sonicwall") and (Activity contains "connection opened" or Activity contains "connection closed") and (Protocol != "udp/dns"))

2 thoughts on “Collecting CEF Syslogs using Azure Monitor Agent”